Monday, April 28, 2014

Springtime Mail Art

Hello everyone!  This month, the Altered Pages Team are cross promoting with the Unruly Paper Arts Blogozine. We are following along with their April issue's theme of Mail Art and Moos, and cross promoting with Leaky Shed to showcase their tiaras and teacups chipboard products.  

For my second post this month, I wanted to include all of the above ideas in one piece of mail art.  So, I made another post card that is quite dimensional, but it can be put in an envelope to be mailed to its rightful recipient.  

Supplies used:

Altered Pages:  AP 2125 - Little Spring Birdies collage sheet; Tags Domestic Postcards
Art Anthology acrylics:  Baby Blue Eyes; Mint Julep; June Bug
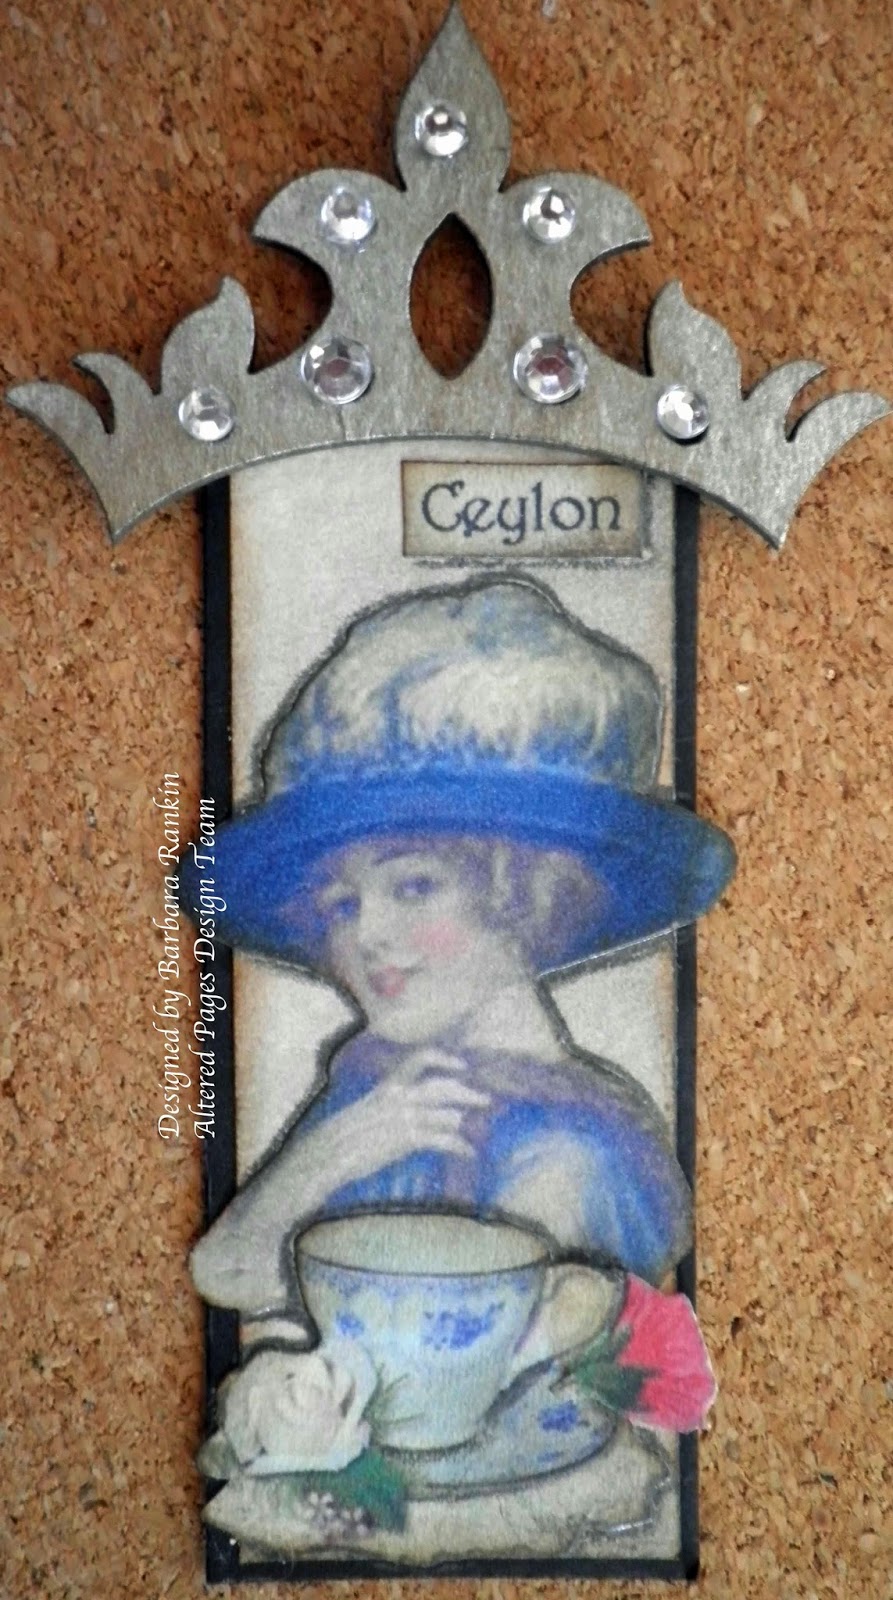
Leaky Shed chipboard:  Tiaras and Teacups; Teacup
USArtQuest duo adhesive
Gold leafing
White Gesso
Fabric flowers
Rubber stamp:  Inkadinkado 60-00463 - flourish corner; Memory Box Miracles of Springtime
Sizzix die:  Bird Branch (Tim Holtz)
Clear embossing powder
Charcoal white pencil
Pearl paint pen (Viva Decor)

I first painted the unprinted side of my post card tag with June Bug, then edged it with Mix'd Media Leather ink and set aside.
Next, I stamped the flourish corner onto the bare teacup and saucer with Versamark ink and heat embossed with clear embossing powder.  I used a stamp positioner to help with placement.
Next, paint teacup and saucer with Baby Blue Eyes and Mint Julep.  While I was blending these two colors, I was thinking how pretty these would be to use with the Mailbox Muse Mermaid kit due out this month.    Did you order your kit yet?
Apply a thin coat of duo adhesive to chipboard crown, allow to dry a few minutes until it is tacky.  Adhere gold leafing and rub off excess.

Glue gilded crown to center of teacup and set aside.

Adhere brown card stock to light weight chipboard and cut out bird branch.  Use whatever parts of the branch you like and those that fit best onto your post card.
Cut out bird nest and red bird from AP 2125 - Little Spring Birdies collage sheet.  Adhere red bird to branch with foam strip.  Cut lower flowers and branch from around bird nest collage image.  This will be placed over the tea cup for dimension. She photo below.

Place a tiny strip of foam tape at the bottom of the saucer and adhere to post card.  

Slip teacup beneath saucer and adhere bird nest collage image before adhering tea cup.

The very last thing I did was to add a bit of Charcoal white pencil to the tree branches to give them a bit of detail and dimension.  I also added flower centers using my pearl paint pen.  

You will see a lot of beautiful artwork by the Altered Pages design team this month using this theme.  I hope I have inspired you with my projects, and please be sure to visit each of our sponsors as well as the Altered Pages store, where you will find all of your supplies for these projects.  

As always, I am so glad you stopped by today, and have a wonderfully creative week ahead.

Barbara

Tuesday, April 22, 2014

Trending Tuesday - Moo Cards

Hello everyone, and welcome back to this month's edition of Trending Tuesday with Altered Pages, wherein we will feature the amazing, and somewhat mysterious, Moo Card.  Why mysterious?  Because it is a mystery to most of us what in the world Moo cards are.  I found this one definition online:  
A 1 1/8 x 2 3/4 inch card, originally named for the company that started printing cards in this format.
Well, there you have it.  It is a simple as that.   While we continue to cross-promote with Unruly Paper Arts and  Leaky Shed, the entire design team at Altered Pages is going to feature art work using this format, along with the Unruly Paper Arts' theme of Teacups and Tiaras, and Leaky Shed's  chipboard tiaras and teacups.


So, in keeping with the theme, here are my Moo cards.  Tea anyone?


Supplies used:
Altered Pages collage sheets:  AP-3033 More Moo Backgrounds;  AP-701 Victorian TeaAP-3032 Tea Party Flowers
Leaky Shed Crown Set
Black chipboard
Rhinestone gem stickers
Gold Encore, Brilliance Platinum Planet ink pads
Gold gilder's paste
Charcoal pencil


Here a a few individual close-ups of each card.


You will see a lot of beautiful artwork by the Altered Pages design team this month using this theme.  I hope you will take a moment to visit their blogs and be prepared to be inspired.  There is a direct link to each designer at the  Altered Pages Blog.  And if you are inspired to try your creative hand at these tiny bits of art, Altered Pages has all the supplies you need to make them.  

Thanks for stopping by, and have a wonderful, creative week!

Barbara

Friday, April 18, 2014

Leslie Rahye's Hippity Hoppity Steampunk Easter Blog Hop


Hello everyone, and welcome to Leslie Rahye's Annual Hippity Hoppity Steampunk Easter Blog Hop. As you may know, several artists get together throughout the year to participate in these blog hops, bringing you their best steampunk creations.  So I hope you will visit each blog, leave each of us a nice comment, and follow our blogs so you don't miss a single thing.  There will be giveaways along the way, so be sure to read to the bottom of each post to see what you need to do to win.  And with that in mind, I am keeping my post short so you can zip through faster and enjoy the pictures.

My flying steampunk Easter egg is made with various materials.  I started out with a metal egg shape from my local craft store, painted with gesso and covered it with printed tissue wrap.  Then I filled it with Creative Paperclay® and made faux riveted metal strips using a technique I learned from Tim Holtz.  He used his metal foil tape, but as you can see, the process translates easily to other mediums as well.
I painted the Paperclay® with silver paint, gave it a wash of black and wiped off the excess.  The roses,  large clock part (lower right) and balloon bird were also made from Paperclay®, painted black, then Gilder's Paste gave it that desired metal look.

Various metal gears were added, and heavy black 20g wire was formed to fit inside, then wire wrapped before being adhered.

More wire and gears were used to connect the egg shape to the balloon bird shape to allow it to hang.  Metal and rhinestone bling were added here and there.

3D paper wings were made from a hammered metal looking paper I had in my stash, embossed in its matching embossing folder, and gilder's paste was again used to highlight the high spots.  I then adhered the wings to the back of the metal egg shape.

Supplies used:

Sin City Stamps:  A Wing Above the Rest
Art Anthology Sorbet Acrylics:  Kona (Altered Pages)
White Gesso (Altered Pages)
Glue n' Seal Matte
Melange Tissue Wrap (Tim Holtz)
Creative Paperclay® modeling material
Lisa Pavelka Connections texture stamp
Adirondack Silver Acrylic Paint Dabber
Charcoal Acrylic Paint
Perfect Pearls:  Cappuccino
Gilder's Paste:  African Bronze, Antique Gold, German Silver, Copper, Verdigris (Altered Pages)
Metal embossing tools (ball and cup, decorative wheels, paper piercer)
Artistic Wire:  10 gauge black; 20 and 22 gauge gun metal
Tim Holtz Idea-ology metal gears
Tim Holtz 3D Wings with matching embossing folder
Metal stud stickers and rhinestone bling

Here are a few close-ups of various parts of my piece.

Sin City Stamp used to mold Paperclay® image

Wire-wrapped gears to connect the two pieces together

Wire-wrapped 20g wire flourishes, clay roses, metal gears
As always, I love having you here.  I hope you will leave me a comment and let me know what you think.  I would really appreciate if you became a follower, too.  That way, you won't miss any of my creative antics.  And please be sure to visit the rest of the bloggers for more fun and creative inspiration.  Links are provided below:
-------------------------------------

Have a very happy Easter!

Barbara

Thursday, April 17, 2014

More Card Fun with Sin City Stamps and Ecstasy Crafts

Hello everyone!  I am happy to share my second Sin City Stamps post for April.  As mentioned before, we are cross-promoting with Ecstasy Crafts.  They sell tons of fabulous products that you just don't see anywhere else.  The best part is that they blend so well with Sin City Stamps products to inspire your creativity.

When I received the Natural Beauty stamp plate from Sin City Stamps, I could hardly wait to use it.  It has the most beautiful images of ladies and botanicals.  I was just waiting for the perfect product pairing to use it.  I think I found it.  So I made this card for today's project.


Supplies used:
Sin City Stamps:  Natural Beauty; Bingo
Ecstasy Crafts:  Ornare Vellum Embossing/Piercing Template-stars (PR0565); Starform 7034 Deco Sticker - Wavy Borders
Pre-printed 4-1/2" x 6-1/4" card (Gartner Studios)
90 grit gold glass glitter, gold microbeads
Vintage Photo, Old Paper distress inks
Memories black ink
Copic markers

Here are a few close-ups to show the dimension.

Finish off the inside with this beautiful sentiment from the Bingo stamp plate using black Memento ink. This is one of my favorite sayings and I think it goes so well with the Natural Beauty images.  
Please visit the Sin City Stamps blog where I have included complete details on how to make this natural beauty.

Thanks so much for stopping by.  Please be sure to visit Sin City Stamps for your stamping, chipboard and stencil needs, and Ecstasy Crafts for their selection of paper crafting tools, stickers, and embellishments.  

Have a wonderful, crafty weekend!  

Barbara

Monday, April 14, 2014

Victorian Tea Room Mail Art

Hello everyone, thanks for stopping by.  This month, Altered Pages is cross-promoting with Unruly Paper Arts, an inspirational and informative blogozine.  This month's theme is mail art, using their creative prompt with the theme Teacups and Tiaras.  We are also cross-promoting with Leaky Shed, a company that makes the most fabulous laser cut chipboard pieces, to show off our mail art using their chipboard tiaras and teacups.   

You will see a lot of beautiful artwork by the Altered Pages design team this month using this theme.  Here is the creative prompt for April.  
So, in keeping with this theme, here is my mail art project, which can also be viewed on their blog e-zine by clicking here:
Postcard Tag Side 1
Postcard Tag Side 2
Supplies used:

Leaky Shed chipboard:  Crown set
Electric Blue, Winter Pine spray mists (Tattered Angels)
Distress Inks:  Pumice Stone; Picked Raspberry, Worn Lipstick (marker)
Eyelet edge punch (Martha Stewart)
Brilliance Pigment ink:  Platinum Planet, Galaxy Gold
Silhouette cutting machine and file:  Tile Border

Directions:

Spritz reverse (unprinted) side of post card tag with Electric Blue and lightly with Winter Pine spray.  Dab excess ink with paper towel and heat to dry.  This will get rid of the curl in the paper.  Edge with Picked Raspberry.
Cut out Victorian Tea Room menu collage image, distress with Pumice Stone.  Color flowers by picking up some color from the Picked Raspberry ink pad with a Worn Lipstick marker.  Adhere image to tag.
Punch a strip of Ivory Astroparche paper with eyelet edge punch, trim strip to 1/2" wide.  Ink strip with Picked Raspberry ink.  
Slightly overlap and adhere two strips to top of tag.
Cut out Victorian lady and flowers and adhere to tag, as shown.
Turn tag over, spritz with Electric Blue and lightly with Winter Pine spray.  Dab excess ink with paper towel and heat to dry.  This will get rid of the curl in the paper.   

I made a stencil by cutting a Tile Border with my Silhouette machine, or you can die cut or punch a design using something you have.  Lay it over the tag, as shown, and sponge Picked Raspberry through the stencil.
I let the stencil fade out to the left.  I like this effect.  
Fussy cut the tea cup, color the flower with Picked Raspberry, and edge tag with Pumice Stone. 
I needed to address my postcard tag, so I cut out "Your Royal Highness" and adhered it beneath the address portion of the postcard.  I edged the image with a strip of gold German scrap, and added a tiara from Leaky Shed.  
Here is a closer look at that tiara.  I inked it with Brilliance Galaxy Gold and Platinum Planet for a more vintage look.  These lasercut chipboard pieces are intricately designed, as you can see in this photo.
I hope you enjoyed my little piece of mail art, and I hope you will visit Unruly Paper Arts and the Altered Pages blog for more RAQ submissions throughout the month.  Our design team will be playing along all month.   
As always, you can get all of your art supplies at Altered Pages.com.  

Thanks for stopping by, and have a wonderful, creative week!!!

Barbara

Thursday, April 3, 2014

Card Fun with Sin City Stamps and Ecstasy Crafts

Hello there SCS stampers. This month, we are being sponsored by Ecstasy Crafts, a fabulous company with some of the most gorgeous products.  The best part is we get to combine their products with Sin City Stamps products.

For my first project, I made this beautiful birthday easel card.  Easel cards are so simple to make, yet really make a statement when the recipient can sit it out for display without it falling over.
Supplies used:

Sin City Stamps:  Steampunk CircusMetal MadnessPam Bray's Fall Collection
Ecstasy Crafts:  Reddy Flowers & Cross 3D Die Cuts No. 83703; Starform 1290 Gold Floral Rectangular Frame Stickers
Cardstock:  Vineyard Weave (Bazzill), Ivory, Lavender (Paper Studio)
Ink pads: Versamark, Gold Encore, Old Paper Distress Ink,
Silhouette and cutting file:  Easel card, Egg shaped card
Spellbinders Die:  Lacy Labels Two
Detail clear and gold embossing powders
3/16" square adhesive foam (Darice)

For my next card, I used the same papers and my Silhouette to cut out an egg shaped card.  If you google egg shaped cards, you should be able to find templates online.
I hope you enjoyed my cards today and will give these products a try.  You can get all you need from both Sin City Stamps and Ecstasy Crafts to complete them and many more.  I have a complete tutorial on how I made these over on the SCS blog. 

Have a wonderful, creative weekend!  

Barbara